

As featured in
The New Zealand Listener & Sussex Life magazines
C r e a t e d b y

Printing
Activity 1: block printing with yarn
1. Simply wrap some string around a wooden block.
2. Seal collage plate with a quick drying household varnish.
3. Roller on water-based safe wash or acrylic ink and print on paper or fabric.

*You could also wrap tape around it or stick cardboard, wallpaper, bubble wrap or
sandpaper underneath to relief print.
Activity 2: Relief with White Glue
1. Draw your design on grey board or cardboard
2. Trace with white glue (PVA).
3. Leave to dry over night and print.

Activity 3: printing using styrofoam
Using styrofoam is great for quick results.

1. Use a stylus or the end of a paintbrush to create your designs or picture.
2. Roll on the right amount of printing ink.
3. Burnish your styrofoam onto a piece of thick white card with a dry roller.
4. Carefully peel off to reveal your masterpiece!

Activity 4: making foam stamps
1. These are hand crafted using a pyrography tool into extra thick craft foam.
2. Mount them onto thick foam for ease of use.
3. Use acrylic paint for printing.
*You could also wrap tape around it or stick cardboard, wallpaper, bubble wrap or
sandpaper underneath to relief print.

Idea from Kate Crane.
Activity 5: hammer a leaf
A form of natural printing you could say! This could lead to a great natural leaf/floral design. Use watercolour paper.

You will need a hammer and 2-3 layers of paper towels to place over the leaves. You can spray it afterwards with UV-protective acrylic spray (in a well ventilated area) to help keep the colours bright.
Artist unknown
Activity 6: foil print monoprints
This activity requires working spontaneously!
1) Cut out a rectangle or square from a piece of grey board (or from a cereal box).
2) Place your rectangle on the foil, wrap foil around the back and stick it in place with sticky tape or masking tape.
3) Blob some acrylic paint - not too much - on the foil side and use a flat brush to spread the paint evenly from side to side.
4) Use a Q-tip to make your art piece.
5) Place a piece of paper on top of the paint, rub it down and peel away to reveal your print!
6) Wipe the foil with a rag and reuse. For added effect you do not need to wipe. Practice makes perfect!
Activity 7: hand prints

This is a good example of a simple hand print, with the ink rolled on your hand and then imprinted on thick paper or card.
1. Blow paint mixed with water through straws to create a reverse image of your hand to mimic those found on cave walls.
2. Surround your hand with words that express your identity and emotions. Your words could be hand drawn or made out of newspaper cut outs.
*Use board to stop buckling.

Look at the most primitive art anywhere, and you will often find that a hand-print is the earliest example to be found.
Activity 8: foot Prints
1. Create a large white surface for a floor space by taping together sheets of thick white paper.
2. Fill a few flat trays with different coloured washable paints/inks (or just one colour) for people to step in. Put them next to the paper's edge on each side.
3. In a group of six or eight, do a circular or random walking meditation, using your bare feet to dip in the ink trays and print.
4. Dip feet in tray again when ink has run out until you have all created your collective piece of art.

Activity 9: Print with found objects
Create a collagraph print using found objects like keys, buttons, leaves and corrugated card, etc., like the one below.

Idea from Kristin Livelsberger.
Activity 10: watercolour spray prints
Why didn't I think of this? All you need is the watercolour paper, trigger spray bottles, and watercolour paint.
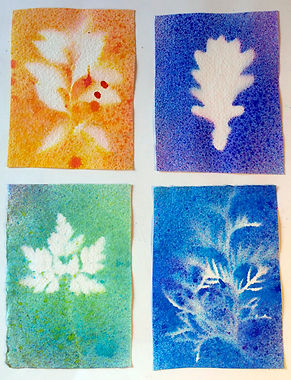
Leaves and plant foliage have been used here and watercolour sprayed over the top, to reveal these lovely pieces.
* You could also experiment with masks, stencils and resists to create patterns.
Idea by Jude.
Activity 11: bubble-wrap printing
I used this activity with an Alzheimer's Society group I work with locally as a volunteer.

For cost-effectiveness I bought some paper plates for mixing and just used primary colour acrylics. It's easier to cut out manageable pieces of bubble-wrap for the group to use.
Paint was applied to the bubble-wrap with a paintbrush and/or fingers and then burnished down on A3 paper by hand.

Activity 12: line printing
For this simple activity use black paint and pieces of card cut from a cardboard box. I suggest using A2 or A1 sheets of cartridge or light coloured sugar paper.

For inspiration have a look at the work of Piet Mondrian in conjunction with this.
